Sunday, December 27, 2009

DB: Gingerbread House


The December 2009 Daring Bakers’ challenge was brought to you by Anna of Very Small Anna and Y of Lemonpi. They chose to challenge Daring Bakers’ everywhere to bake and assemble a gingerbread house from scratch. They chose recipes from Good Housekeeping and from The Great Scandinavian Baking Book as the challenge recipes.

This month's DB challenge was to make a Gingerbread house from scratch. I have to say, I gave up! The fourth wall fell to the floor and crashed, the roof didn't fit quite well, and I had TONS of extra accessories. I wasn't following directions exactly (first mistake), I didn't check to make sure they were all going to fit together when they were warm (second mistake) and I didn't guard my pieces. I did use a template (although unsuccessfully) and used all the recipes as written. The recipe was delicious, however, and I happily munched on my leftover cookies while I waited for Diana of Thyme To Lime to finish hers. She came over so we could decorate together... Christmas is the time for friends and togetherness. Check out her site to see what she cooked up, and be sure to check out all the Daring Bakers at The Daring Kitchen.

Merry Christmas!!


2 1/2 cups (500g) packed dark brown sugar
1 1/2 cups (360mL) heavy cream or whipping cream
1 1/4 cups (425g) molasses
9 1/2 cups (1663g) all-purpose flour
2 tablespoon(s) baking soda
1 tablespoon(s) ground ginger

Directions

1. In very large bowl, with wire whisk (or with an electric mixer), beat brown sugar, cream, and molasses until sugar lumps dissolve and mixture is smooth. In medium bowl, combine flour, baking soda, and ginger. With spoon, stir flour mixture into cream mixture in 3 additions until dough is too stiff to stir, then knead with hands until flour is incorporated and dough is smooth.

2. Divide dough into 4 equal portions; flatten each into a disk to speed chilling. Wrap each disk well with plastic wrap and refrigerate at least 4 hours or overnight, until dough is firm enough to roll.

3. Grease and flour large cookie sheets (17-inch by 14-inch/43x36cm)

4. Roll out dough, 1 disk at a time on each cookie sheet to about 3/16-inch thickness. (Placing 3/16-inch dowels or rulers on either side of dough to use as a guide will help roll dough to uniform thickness.)

5. Trim excess dough from cookie sheet; wrap and reserve in refrigerator. Chill rolled dough on cookie sheet in refrigerator or freezer at least 10 minutes or until firm enough to cut easily.

6. Preheat oven to 300 degrees F (149C)

7. Use chilled rolled dough, floured poster board patterns, and sharp paring knife to cut all house pieces on cookie sheet, making sure to leave at least 1 1/4 inches between pieces because dough will expand slightly during baking. Wrap and reserve trimmings in refrigerator. Combine and use trimmings as necessary to complete house and other decorative pieces. Cut and bake large pieces and small pieces separately.

8. Chill for 10 minutes before baking if the dough seems really soft after you cut it. This will discourage too much spreading/warping of the shapes you cut.

9. Bake 25 to 30 minutes, until pieces are firm to the touch. Do not overbake; pieces will be too crisp to trim to proper size.

10. Remove cookie sheet from oven. While house pieces are still warm, place poster-board patterns on top and use them as guides to trim shapes to match if necessary. Cool pieces completely before attempting to assemble the house.


Royal Icing:

1 large egg white
3 cups (330g) powdered sugar
1 teaspoon white vinegar
1 teaspoon almond extract

Beat all ingredients until smooth, adding the powdered sugar gradually to get the desired consistency. Pipe on pieces and allow to dry before assembling. If you aren't using it all at once you can keep it in a small bowl, loosely covered with a damp towel for a few hours until ready to use. You may have to beat it slightly to get it an even consistency if the top sets up a bit. Piped on the house, this will set up hard over time.


Friday, December 25, 2009

Merry Christmas 2009


Our Christmas tradition includes everyone squishing into one bed with the dogs, reading Christmas advent, The Crippled Lamb by Max Lucado, and of course, Twas the Night before Christmas. We all wear footie pajamas. This may not seem odd for those of you with small children but our stats are me- 26 yrs, 6 ft, my brother 24 years 6'5'', and my other brother 6'3'' and 16 years. Not the usual suspects to be running around the house in one piece footie pajamas! In the morning, the first one up runs around to the other two waking them up, and we all wait at the top of the stairs, chomping at the bit to run down while my parents get the video camera. After a few minutes of boxing out and shoving around, my parents say GO and we run down the stairs trying not to knock each other out completely. Then we all sit around the tree with the pups and open gifts.

After gifts we make a fabulous breakfast, this time waffles with homemade blackberry jam, scrambled eggs and potato hash with ham and bacon. Delicious. I promply napped for a few hours after that, and now we are getting ready for Christmas dinner. We have Indian food from our favorite restaurant, as well as holiday favorites like corn pudding, pineapple souffle, chiltlins, beef roast, cabbage and asparagus. Quite the mix, but we're kinda crazy like that. Who needs a theme, just eat what tastes good! I need to get back to cooking, I have sweet potato creme brulees in the oven. I can't wait to use my new kitchen torch that Santa brought! Woohoo!!

Wishing everyone a very merry christmas, and happy holidays!


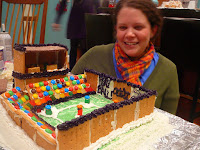
Lindsay with her prize winning gingerbread stadium. She did an AMAZING job!


**If youre in the mood for gingerbread, Nigella's gingerbread is the most fabulous, tasty moist gingerbread out there. My dad had two bites of it and insisted I get to work on a second batch immediately!!

Friday, December 18, 2009

DC: Salmon en Croute


The 2009 Daring Cooks challenge was hosted by Simone of Junglefrog Cooking. Simone chose Salmon en Croute (or alternative recipes for Beef Wellington or Vegetable en Croute) from Good Food Online.


This month's Daring Cook's challenge was to make the gourmet creation "Salmon en Croute" which loosely translates to fish wrapped in a dough package. I'll keep this short and sweet- this recipe was amazing! I cheated and used Pillsbury refrigerated pie crust (in a long skinny red box in the biscuit section) and it was a 3 step meal! You can jazz it up to look fancy for a dinner party, or just treat yourself to a fabulous meal any day of the week!

As a side note: my apologies for the late post, I actually made this recipe before the deadline, then had a bunch of drama and got very distracted. Luckily, drama's over, and I'm liberated.


Salmon en Croute:

Preparation time: Total prep time incl. cooking for the Salmon is 50 minutes
Total prep time for the Beef Wellington is 3 hours
Shortcrust pastry : 50 minutes (optional)

Equipment required:
For the Salmon en croute
oven
foodprocessor
rolling pin
For the Beef Wellington
Blender or food processor
Frying pan
15 cm crepe pan or small frying pan or griddle
cling film
oven

Salmon en croute:
Ingredients
Mascarpone or creamcheese 5.2 ounces/150 gr
Watercress, rocket (arugula) and spinach - 0.6 cup/4.2 ounces/120 gr
Shortcrust pastry - 17.6 ounces, 500 gr. Use a butterversion such as Jus-rol which is frozen or dorset pastry. or... make your own!
Salmon fillet (skinless)- 17.6 ounce/500 gr
egg - 1 medium sized

Directions:
1.Heat the oven to 200°C/390 F. Put the mascarpone or cream cheese in a food processor with the watercress, spinach and rocket and whizz the lot until you have a creamy green puree. Season well.
2. Roll the pastry out so you can wrap the salmon in it completely (approx. 2-3 mm thick) and lay it on a buttered or oiled baking sheet (it will hang over the edges). Put the salmon in the middle. If it has a thinner tail end, tuck it under. Spoon half of the watercress mixture onto the salmon. Now fold the pastry over into a neat parcel (the join will be at the top, so trim the edge neatly), making sure you don’t have any thick lumps of pastry as these won’t cook through properly. Trim off any excess as you need to. Make 3 neat cuts in the pastry to allow steam to escape and make some decorations with the off-cuts to disguise the join if you like. Brush with the egg glaze.
3. Bake for 30 minutes or until the pastry is crisp and browned. To test wether the salmon is cooked, push a sharp knife through one of the cuts into the flesh, wait for 3 seconds then test it against the inside of your wrist; if it is hot, the salmon is cooked. Serve with the rest of the watercress puree as a sauce.

Sunday, December 6, 2009

Garden cake


My friend Aisha's dad's birthday was coming up and she decided to help throw him a birthday party! I'm all about celebrations and celebrating people's birthdays in a special way, so I offered to make a cake. She one-upped me and wanted to help me make it. We were thinking of different designs for the cake and decided that he loved gardening so we picked the garden cupcakes from the "Hello Cupcake" book and adapted it to a 9x11 sheet cake. Everything on the cake is edible: Signs are graham crackers coated with white chocolate and icing for writing, the lettuce is green icing covered corn flakes, radishes and carrots are laffy taffy and starbursts, and peas are m &ms with laffy taffy. Of course there's chocolate graham cracker dirt!

I didn't quite have enough time to make really pretty pictures, we were making this thing up to the last minute! It took a long time to make each individual candy, and for that reason I'm not excited to make it again, but boy was it a showstopper!

The cake turned out wonderfully, oh yeah, its just a basic chocolate cake (my favorite is on the back of the hershey's cocoa, substituting butter for oil) and the chocolate frosting (also on the can).

Happy Birthday Aisha's Dad!

Thursday, November 26, 2009

Happy Thanksgiving!!


Happy Thanksgiving to all! I have SO MUCH to be thankful for! I am so blessed in so many ways, it would take hours to name them all. Enjoy the feast!

Wednesday, November 25, 2009

MSC Sweet Potato Cupcakes


First off, let me say that sweet potatoes are my favorite vegetable. I could eat sweet potato any way they are cooked; tempura in sushi, in fabulous creme brulee at Acacia, baked on the hot bar at the UVA cafeteria, or mashed with marshmallows in our family's holiday casserole. I L O V E sweet potato. Just thinking about it makes me salivate, so when I saw that this month's MS Cupcakes Club Challenge was her Sweet Potato Cupcakes. Let me cut to the chase, these cupcakes were fabulous!! My dad and brother both made it a point to independently tell me that these were the "BEST CUPCAKES I'VE EVER EATEN! IN MY LIFE!!" My dad emphatically told me how good they are and ate 4 on the spot. My dad has been subject to many successful and unsuccessful cupcake attempts over the years, and for him to say these are his favorite EVER is really making a statement. Even the BF had nothing but praise for these little babies and he doesn't even like CAKE!

Unfortunately the recipe is not on the Martha Stewart website so I can't post a link, but I feel like if you google it someone will have posted this fabulous recipe. My only altera
tion was not bothering to make the candied pecans and using one large marshmallow as topping instead of mounding mini marshmallows. PLEASE try these cupcakes! They are delicious, perfect for a holiday party, and so easy to make!!

Tuesday, November 24, 2009

Are you a Mexi-CAN or a Mexi-Can't?


I just got back from Mexico a few days ago, and I just can't get over how awesome it was! We went to an all inclusive resort, the NH Riviera Cancun, located in Puerto Morales, about 20 min South of Cancun Airport. The food was overall very good, but by no means a culinary masterpiece! My favorite meal was lunch. It was a fillet of white fish (tilapia?) fried on the grill served with rice and steamed veggies. I took it up a notch by smothering the whole thing in guacamole and pico de gallo. YUM! It was absolutely divine, and I'd like to believe it was healthy since it was fish with veggie salsa and avocados. You can't beat guacamole from Mexico, for whatever reason its always better than when I make it. Oh well.... I'll keep trying until I go back!

Monday, November 23, 2009

Crab and Corn Bisque


I went to Mexico for 6 days, it was AWESOME, and definitely contributed to my delinquency with this poor blog. I left sunny 85 degree weather and came back to the remnants of Ida, one nice day, and rain falling with the night. The cool rainy weather really makes me want to snuggle up with a soft velour blanket, some hot cocoa, my puppies, a good book and a bowl of hot soup. I guess being by the ocean made me crave some serious seafood, and I was reminiscing on some delicious she-crab soup so I decided on crab soup. I looked up she-crab soup on the internet, although I couldn't find a specific recipe for that, but this Corn and Crab Bisque from Emeril recipe came pretty close. I doubled the crab in it, my main gripe with restaurant soups is that you have to hunt for the crab! I thought I had milk at home but I didn't, so for half the milk volume I used cream, and the other half I used seafood stock. Otherwise I followed the recipe as is. Not sure my blond roux came out, but I cooked the death out of some flour and butter, and it thickened, so I guess it worked out fine... I'll have to work on this again for the next time, and there definitely will be a next time!!! This soup was absolutely delicious!! The BF said it was "the best soup I've ever had." Brother was also a huge fan. Almost the whole bath was devoured the same day. Tomorrow I'll be posting my better late than never MSC recipe of the month: Sweet Potato Cupcakes. Yum!!

Saturday, November 14, 2009

DC: SUSHI!


I was SO excited to see SUSHI as this month's Daring Cook's Challenge! I made sushi often, so it wasn't too far outside of my comfort zone, so I tried to mix up the fillings a bit, and to make some really pretty looking rolls. The top roll there is a gorgeous and oh so easy to create salmon sushi roll.I also made some salmon and tuna nigiri sushi...

And my personal favorite, a steak and avocado topped spicy tuna with cucumber roll! Call is the Chubby roll. So delicious!
I seared some steak and put it on top of a basic inside out roll with spicy tuna and cucumber strips inside. I love sushi!! The whole family came over, and we had a good old fashioned sushi throwdown! Yum!!!

Tips for sushi:
For cucumbers, peel them, cut in half lengthwise, and then scoop out seeds with a spoon and cut the remaining flesh lengthwise into rectangles.

Vegetables are best cut into long skinny rectangles, it works best to fill with.

Spicy Tuna recipe: sashimi grade tuna, diced mixed with Real Mayo- Hot and Spicy variety, green onions diced finely, and tobiko or some other type of fish roe.

When rolling, roll and pull the sushi roll toward you at the same time as to decrease the extra space and make the roll as tight as possible. If it is not tight it will fall apart when you try to cut it!

ALWAYS use SASHIMI GRADE fish! If not you could get seriously ill. That's no fun for anyone!!

The recipe for the gorgeous sushi rolls was found here.

Tuesday, October 27, 2009

DB: Macarons- Parlez vous francais?

I was really excited to see macarons as the challenge for this month's Daring Baker's Challenge! When I first discovered the food blog world I saw the abundance of macarons out there in cyberspace, all colors and flavors, and I even tried to make them a couple times. I was expecting this a long time ago, and after a few months of being in Daring Baker's with no macarons I was beginning to think the challenge was never going to happen! Alas, finally, the macaron challenge!

The 2009 October Daring Bakers’ challenge was brought to us by Ami S. She chose macarons from Claudia Fleming’s The Last Course: The Desserts of Gramercy Tavern as the challenge recipe.


For those who are not familiar: "In the United States, the term “macaroon” generally refers to a cookie made primarily of coconut. But European macaroons are based on either ground almonds or almond paste, combined with sugar and egg whites. The texture can run from chewy, crunchy or a combination of the two. Frequently, two macaroons are sandwiched together with ganache, buttercream or jam, which can cause the cookies to become more chewy. The flavor possibilities and combinations are nigh endless, allowing infinitely customizable permutations." Take a look and see- explore other Daring Bakers to see what they came up with!

So below is a picture of the macarons I made following the Gramercy Tavern Recipe. Strawberry and Chocolate, with a salted caramel filling or a chocolate ganache. Clearly these macarons were unsuccessful. No feet, didn't rise much, but boy did they look pretty! Many people in the forums commented on the ratio of nuts to whites to sugar, and apparently this recipe does not have the optimal foolproof ratio. To make them flavored I added dried strawberries to the food processor to make strawberry powder, and for the chocolate ones I substituted 2 tbsp cocoa powder for powdered sugar. I recommend using Tartelette's recipe or Veronica has the Macaron Chronicles detailing how to make macarons and the many steps. For the ganache I just used about equal parts heavy cream and chocolate chips and a touch of oil for shine.

After that try I gave up on that recipe and went back to Tartelette's recipe that I've made successfully before, but I only had maybe 1/4 amount almonds, so I used that little bit of almonds and supplemented the remainder with hazelnuts. Tartelette recommends using at least half almonds, but mine worked perfectly even with far more hazelnut than almond. I used Veronica's Caramel Fleur de Sel Recipe (except just with Kosher salt!-aka salted caramel). It is good enough to eat with a spoon. It is sweet and salty and not too rich. It is the perfect combo of flavors, and the consistency is smooth and thick. Delicious. It tasted great with the macarons. My only complaint is that they are so sweet! I measure everything out by weight, so I'm not sure if it's something I'm doing or if they're just super sweet by nature, but it's borderline too much! I think I'd enjoy them more with a bit more nut flavor and less sweetness. I want to try more flavors, because I liked the taste of the strawberry and chocolate ones, even though they did not work out well. For a beginner baker they may be intimidating, there are a lot of steps that require a certain amount of precision. I believe weighing the ingredients makes it more accurate and turns out a better recipe. Also good ideas are baking them in low humidity, because higher humidity increases failure rates according to what I've seen. As for the aged egg white question: I used both aged and microwaved in my attempts. I didn't see a lot of difference, but I would recommend one or the other instead of using fresh whites. If pressed for time, just pop them in the microwave for 5 seconds, twice.

Great Challenge Ami!
Basic Macaron Recipe:

Preparation time: Not taking into account the amount of time it takes for you to bring your egg whites to room temperature, the whole baking process, including making the batter, piping and baking will probably take you about an hour to an hour and a half. How long it takes to make your filling is dependent on what you choose to make.

Actual baking time: 12 minutes total, plus a few minutes to get your oven from 200°F to 375°F.

Equipment required:
• Electric mixer, preferably a stand mixer with a whisk attachment
• Rubber spatula
• Baking sheets
• Parchment paper or nonstick liners
• Pastry bag (can be disposable)
• Plain half-inch pastry bag tip
• Sifter or sieve
• If you don’t have a pastry bag and/or tips, you can use a Ziploc bag with the corner snipped off
• Oven
• Cooling rack
• Thin-bladed spatula for removing the macaroons from the baking sheets
• Food processor or nut grinder, if grinding your own nuts (ouch!)

Ingredients
Confectioners’ (Icing) sugar: 2 ¼ cups (225 g, 8 oz.)
Almond flour: 2 cups (190 g, 6.7 oz.)
Granulated sugar: 2 tablespoons (25 g , .88 oz.)
Egg whites: 5 (Have at room temperature)

Directions:

1. Preheat the oven to 200°F (93°C). Combine the confectioners’ sugar and almond flour in a medium bowl. If grinding your own nuts, combine nuts and a cup of confectioners’ sugar in the bowl of a food processor and grind until nuts are very fine and powdery.
2. Beat the egg whites in the clean dry bowl of a stand mixer until they hold soft peaks. Slowly add the granulated sugar and beat until the mixture holds stiff peaks.
3. Sift a third of the almond flour mixture into the meringue and fold gently to combine. If you are planning on adding zest or other flavorings to the batter, now is the time. Sift in the remaining almond flour in two batches. Be gentle! Don’t overfold, but fully incorporate your ingredients.
4. Spoon the mixture into a pastry bag fitted with a plain half-inch tip (Ateco #806). You can also use a Ziploc bag with a corner cut off. It’s easiest to fill your bag if you stand it up in a tall glass and fold the top down before spooning in the batter.
5. Pipe one-inch-sized (2.5 cm) mounds of batter onto baking sheets lined with nonstick liners (or parchment paper).
6. Bake the macaroon for 5 minutes. Remove the pan from the oven and raise the temperature to 375°F (190°C). Once the oven is up to temperature, put the pans back in the oven and bake for an additional 7 to 8 minutes, or lightly colored.
7. Cool on a rack before filling.

Yield: 10 dozen. Ami's note: My yield was much smaller than this. I produced about two dozen filled macaroons.

Additional Information:

Get inspired by our own Tartlette!: http://www.mytartelette.com/search/label/macarons
Go behind the scenes of Paulette: http://www.youtube.com/watch?v=qXIvX0-CEu0


Wednesday, October 21, 2009

MSC- Pumpkin Patch Cupcakes


This month's MS Cupcakes Club recipe featured the Pumpkin Patch Cupcakes, in perfect time for Halloween. In the cookbook they have a super cute marzipan cupcake on each cake. Unfortunately I just spent 4 hours working on a garden themed cake with vegetables made of starbursts and laffy taffies and I was just not in the mood to take the time to make a bunch of tiny pumpkins.


Overall, this recipe is a grand slam! The cupcakes are not too overpoweringly pumpkin, they are very light and just the right moistness level. They are not dense and thick like pumpkin bread, and lighter and a bit sweeter than a muffin, they truly live up to a cake consistency. The flavor is amazing. My family doesn't usually like pumpkin flavored things, we're more sweet potato people, but these cupcakes definitely make me rethink that. They're delicious!
We started eating them without frosting because I made them late night, and the universal feeling was that they don't really need frosting at all because they are so delicious naked.
These cupcakes are a perfect way to welcome in fall and pumpkin season, and a cinch to make! I had all the ingredients already at home except for the canned pumpkin. I halved the recipe and still got 18+ cupcakes! For whatever reason Martha's recipes always turn out way more than the predicted amount. Overall this recipe was fantastic, and I will definitely be making it again!


Broken Computer

So guys, my computer screen has been out of commission, and after an hour long stay at the apple store, they took it in to get it fixed. Interestingly, the screen started to work as I was trying to back up my time machine in the store! AH! Now I'm waiting to pick it up. It's 9:52 and they dont open until 10:00 so I figured Id just give you the heads up that new posts are coming! The first one will be Martha Stewart's pumpkin patch cupcakes! Theyre the latest recipe for the MS Cupcake Club. I have been cooking in the meantime, just unable to post online! Worst part is, all of that, and they can't find anything wrong with it. Just my luck. I guess its better than needing to keep it for weeks to fix it!

Tuesday, October 13, 2009

DC: Pho:n Food!


I love Pho (pronounced fuh), especially on a cold winter day, or when I think I might be coming down with something. The savory hot broth and added extra spice clears sinuses and satiates an empty stomach. This is why I was really excited to see that Jaden (food blog celebrity of Steamy Kitchen) was hosting Daring Cooks and chose Pho for our challenge. We are using her shorthand version, but an extended version can be found on her site here, and in her new Cookbook, due out this month!

The October 2009 Daring Cooks’ challenge was brought to us by Jaden of the blog Steamy Kitchen. The recipes are from her new cookbook, The Steamy Kitchen Cookbook.


If you're not familiar with Pho, here's what wikipedia has to say:"
Phở (Vietnamese pronunciation: [fə̃ː] (Speaker Icon.svg listen); in English, written pho and typically pronounced /ˈfʌ/[1]) is a Vietnamesebeef and noodle soup from North Vietnam.[2] The soup includes noodles made from rice and is often served with basil,lime, bean sprouts and peppers that are added to the soup by the customer."
In other words- Pho is basically a jazzed up noodle soup with a delicious spiced broth and other mix ins that make it customizable to each diner's individual taste.

My experience making the Pho was overall a good one. My main problem came when adding the broth. Somewhere in my freezer is a block of homemade chicken stock. I pulled out what I thought was that stock, went along with the recipe, but was shocked to see shrimp when I began to strain the broth before serving. The block I used was not the chicken broth, but a Thai soup I had made and frozen. Perfect Pho broth tainted with thai soup filled with shrimp, lemongrass, coconut milk, garlic and lime zest. Oh well. Luckily it was probably equal parts thai soup and chicken stock, so it was diluted a bit. I could taste that the broth did not have the clear and pure flavors, but it did not taste bad. The main thing I noticed was that the soup made the broth cloudy and not crystal clear like a good pho is. Overall it is delicious, but not as delicious as my local Pho joint, so I think for now I'll continue to hit up there for my Pho cravings!

On to the goods: the recipe!

Pho Ga

Equipment:

• Frying pan
• Large stockpot
• Tongs
• Strainer, sieve or colander
• Bowls for serving

Preparation Time: 45 cooking time + 15 minutes to cook noodles based on package directions

Servings: Makes 4 servings

Ingredients:

For the Chicken Pho Broth:
2 tbsp. whole coriander seeds
4 whole cloves
2 whole star anise
2 quarts (2 liters/8 cups/64 fluid ounces) store-bought or homemade chicken stock
1 whole chicken breast (bone in or boneless)
½ onion
1 3-inch (7.5 cm) chunk of ginger, sliced and smashed with side of knife
1 to 2 tbsps. sugar
1 to 2 tbsps. fish sauce

1 lb. (500 grams/16 ounces) dried rice noodles (about ¼ inch/6 mm wide)

The Spices:

Accompaniments:

2 cups (200 grams/7 ounces) bean sprouts, washed and tails pinched off
Fresh cilantro (coriander) tops (leaves and tender stems)
½ cup (50 grams/approx. 2 ounces) shaved red onions
½ lime, cut into 4 wedges
Sriracha chili sauce
Hoisin sauce
Sliced fresh chili peppers of your choice

Directions:

  1. To make the Chicken Pho Broth: heat a frying pan over medium heat. Add the coriander seeds, cloves and star anise and toast until fragrant, about 3-4 minutes. Immediately spoon out the spices to avoid burning.
  2. In a large pot, add all the ingredients (including the toasted spices) and bring to a boil.
  3. Reduce the heat to medium-low and let simmer for 20 minutes, skimming the surface frequently.
  4. Use tongs to remove the chicken breasts and shred the meat with your fingers, discarding the bone if you have used bone-in breasts.
  5. Taste the broth and add more fish sauce or sugar, if needed. Strain the broth and discard the solids.
  6. Prepare the noodles as per directions on the package.
  7. Ladle the broth into bowls. Then divide the shredded chicken breast and the soft noodles evenly into each bowl.
  8. Have the accompaniments spread out on the table. Each person can customize their own bowl with these ingredients.

Extended Pho Ga recipe: http://steamykitchen.com/139-vietnamese-chicken-noodle-soup-pho-ga.html